Difference between revisions of "DAQ6 CentOS7 install"
| (4 intermediate revisions by the same user not shown) | |||
| Line 1: | Line 1: | ||
| − | |||
| − | |||
| − | |||
| − | |||
| − | |||
| − | |||
| − | |||
| − | |||
| − | |||
=Setup Disk array= | =Setup Disk array= | ||
| Line 39: | Line 30: | ||
After the above is setup, the standard installation procedure from a Live DVD can be used to install CentOS 7 | After the above is setup, the standard installation procedure from a Live DVD can be used to install CentOS 7 | ||
| − | = | + | =Window manager= |
| + | == Install FVWM== | ||
| + | |||
| + | KDE was very slow so I installed FVWM using | ||
| + | |||
| + | as root | ||
| + | |||
| + | yum install fvwm | ||
| + | |||
| + | I then set the runlevel to 3 | ||
| + | |||
| + | systemctl set-default multi-user.target | ||
| + | |||
| + | |||
| + | you then login as daq and create the file ".xinitrc" with the line entry | ||
| + | |||
| + | exec /usr/local/bin/fvwm | ||
| + | |||
| + | |||
| + | this will launch fvwm for you if you type the folowing on the command line | ||
| + | |||
| + | ssh-agent startx | ||
| + | |||
| + | |||
| + | ==Install Xfce== | ||
| + | |||
| + | did not use Xfce as a window manager but used fvwm above | ||
| + | |||
yum install epel-release | yum install epel-release | ||
| Line 64: | Line 82: | ||
ls -l /etc/systemd/system/display-manager.service | ls -l /etc/systemd/system/display-manager.service | ||
| + | =hosts file= | ||
| − | + | added teh following lines to the /etc/hosts so computer names are mapped to IP addresses | |
| − | |||
| − | |||
| − | |||
| − | |||
| − | |||
| − | |||
| − | |||
| − | |||
| − | |||
| − | |||
| − | |||
| − | |||
| − | |||
| − | |||
| − | |||
| − | |||
| − | |||
| − | |||
| − | |||
| − | |||
| + | 134.50.3.132 rocdaq2 rocdaq2.physics.isu.edu | ||
| + | 134.50.3.153 daq6 daq6.physics.isu.edu | ||
[[Host_Computer_Configuration#DAQ6_configuration]] | [[Host_Computer_Configuration#DAQ6_configuration]] | ||
Latest revision as of 21:30, 19 May 2017
Setup Disk array
The SAS hard drives are not recognized when the computer is first taken out of the box
You need to enter the Configuration Menu from the BIOS by hitting Ctrl-S. You get to this point during the boot process by hitting any key after the computer has done a self diagnostic.
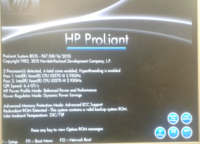
The Startup Splash screen takes a while to come up and looks like this
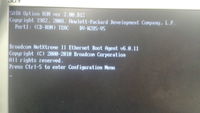
After you see the above splash scree and hit any key you will see the screen go dark and then asked to hit Ctrl-s
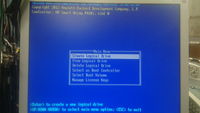
Below is the configuration menu you will see, select the Create Logical Drive menu item
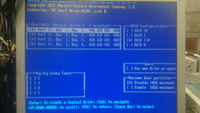
Below is the configuration chosen to read a RAID disk using the four drives in a RAID 10 (1+0) configuration
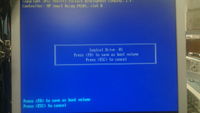
You then return to the configuration menu and select "Select Boot Volume" to see the screen below
After the above is setup, the standard installation procedure from a Live DVD can be used to install CentOS 7
Window manager
Install FVWM
KDE was very slow so I installed FVWM using
as root
yum install fvwm
I then set the runlevel to 3
systemctl set-default multi-user.target
you then login as daq and create the file ".xinitrc" with the line entry
exec /usr/local/bin/fvwm
this will launch fvwm for you if you type the folowing on the command line
ssh-agent startx
Install Xfce
did not use Xfce as a window manager but used fvwm above
yum install epel-release
yum --enablerep=epel -y groups install "Xfce"
then setup the graphical target
systemctl isolate graphical.target
to keep it as the default
sudo systemctl set-default graphical.target
rm '/etc/systemd/system/default.target'
ln -s '/usr/lib/systemd/system/graphical.target' '/etc/systemd/system/default.target
the command below will check which GUI is used
ls -l /etc/systemd/system/display-manager.service
hosts file
added teh following lines to the /etc/hosts so computer names are mapped to IP addresses
134.50.3.132 rocdaq2 rocdaq2.physics.isu.edu
134.50.3.153 daq6 daq6.physics.isu.edu
